Instrument editor
When clicking on one or more instrument(s) in the tree, the editing page of instruments appears.
This page comprises several parts:
- the table,
- the range editor when the button Edit ranges from the toolbar is clicked,
- the envelope editor when the button Edit envelope from the toolbar is clicked,
- the modulator section.
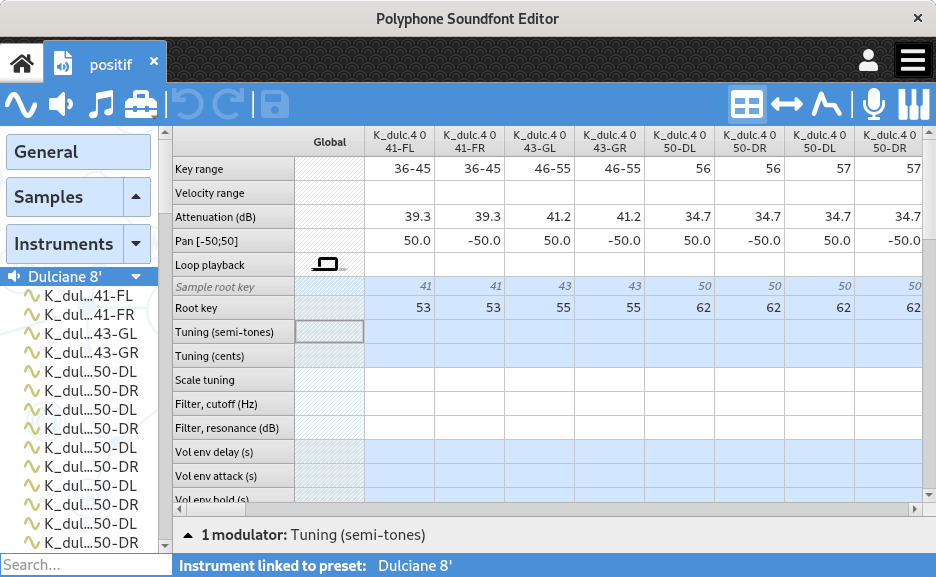
If only one instrument is selected, the page allows the editing of the global parameters of the instrument and the parameters of all its divisions.
In the case where several instruments are selected, the global parameters of each of these instruments can be edited.
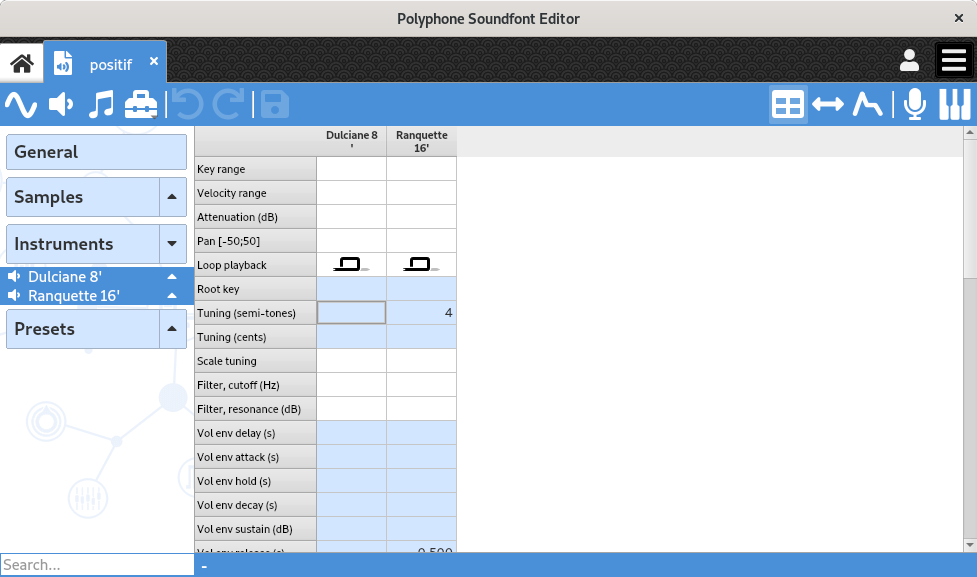
Table
Presentation
The table allows a global view and the editing of an instrument configuration. A change of a parameter in the Global division applies to all divisions, except for divisions whose same parameter is already specified (local override).
The editable parameters are:
- Key range
- Key range for which the sample will be heard.
- Velocity range
- Velocity range for which the sample will be heard. It is possible to set different sounds for the same note, with different velocity ranges, to distinguish different nuances of a piano key for example.
- Attenuation (dB)
- Attenuation in decibel applied to the sample.
Note: the sf2 format doesn't allow this value to be negative, no amplification is thus possible. - Pan
- Balance applied to the sound, to hear it to the left or to the right in stereo.
- Sample playback
 indicates a sound reproduced with no loop.
 indicates a sound which loops continuously.
 is for triggering a sample playback when a key is released. The volume envelop is still used for defining the volume and a short attack (0.2 ms) is added for smoothing the start of the sample on the release.
 indicates a sound which loops for the duration of key depression and then proceeds to play the remainder of the sample.
Note: the playback mode “release” is NOT documented by the sf2 format, so other players such as FluidSynth may decide not to implement it. The other way to achieve this behavior is to double each sample with a sample containing a short silent loop followed by the sound to emit on the release. The added sample will be read with the playback parameter “loop on + release”.- Root key
- Allows you to change the normal root key of a sample to a different note from that usually used. For example, if a sample has a root key of 50 and is played over the key range [49 - 51], it will be initially transposed by -1, 0, and +1 semitone(s) on keys 49, 50, and 51 respectively. If the root key is then overridden to 51 at the instrument level, the same sample will be initially transposed by -2, -1, and 0 semitone(s) on keys 49, 50, and 51 respectively.
- Tuning (semitones and cents)
- Adjusts the tuning in semitones and hundredths of a semitone. This transposition is added on top of the initial transposition related to the triggered note (for example, the initial transposition of a sample with a root key of 60 will be +2 semitones if the key pressed on the keyboard is 62).
- Tuning (scale)
- This parameter modifies the interval between two consecutive notes and will therefore affect the initial transposition linked to the triggered note. A value of 100 represents the equal temperament scale: 100 hundredths of a semitone are used to transpose a sample from one key to the next. A value of 0 disables this initial transposition, meaning the sample will be played identically across all keys on the keyboard.
- Filter
- Apply a low-pass filter, by specifying the cutoff frequency and the resonance.
- Volume envelope
- Change the volume envelope, and possibly how it changes with the note.
- Modulation
- Set a modulation (envelope, delay, frequency, changes with the note) and its effect on the tone, filter and volume.
- Vibrato
- Set a vibrato (delay, frequency) and its effect on the tone.
- Exclusive class
- This parameter can define one or more exclusive classes, by assigning to a set of divisions within a class the same parameter value other than 0. When an exclusive class is defined, any note triggered from one of the divisions of the exclusive class ends all the other sounds of the same class. The scope of an exclusive class is the preset in which the class is defined (a sound triggered in an instrument will end a sound of another instrument if the two instruments are in the same preset). This effect can be used for percussion instruments like a cymbal. Basically playing one note automatically terminates another in the same group.
- Chorus and reverb
- Indicates the intensity of chorus and reverb effects. The effects are configurable in the software settings.
- Fixed key and velocity
- Force the value of the key and of the velocity on the full extent of the division.
- Offsets
- Changes the positions of the start and end of a sound during playback, as well as the start and end of the loop. The unit of an offset is samples (number of values).
Editing facilities in the table
To facilitate and speed up editing in the table, the following features have been implemented:
- the mouse wheel may be used to change a value (the cell has to be in edit mode first),
- an external keyboard can be used to set the rootkey, key range and velocity range (the cell has to be in edit mode first),
- a multiple selection, followed by the editing of the last cell, will edit all cells simultaneously,
- the keys Del and Backspace clear the content of all selected cells,
- stereo divisions may be edited simultaneously if the option is enabled in the software preferences,
- key names may be numeric or as a text (having C3, C4 or C5 as middle C), depending on the option chosen in the preferences,
- copy / paste / cut of a set of cells (not necessarily adjacent) may be done via Ctrl+C / Ctrl+V / Ctrl+X.
Do not forget the tools available! In particular the tool allowing a key-based configuration.
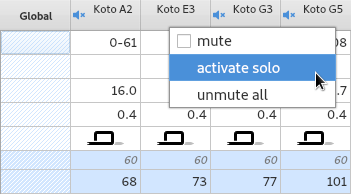
Possibility to mute divisions
For testing purposes, it is possible to mute a division or mute all divisions but one in the tables. The options are accessible with a right click on the header of a division, and also in the contextual menu of the tree.
Range editor
The range editor allows you to quickly and graphically dispose samples according to their key and velocity ranges. This graph further highlights configuration problems, such as zones free of samples or unwanted superpositions.
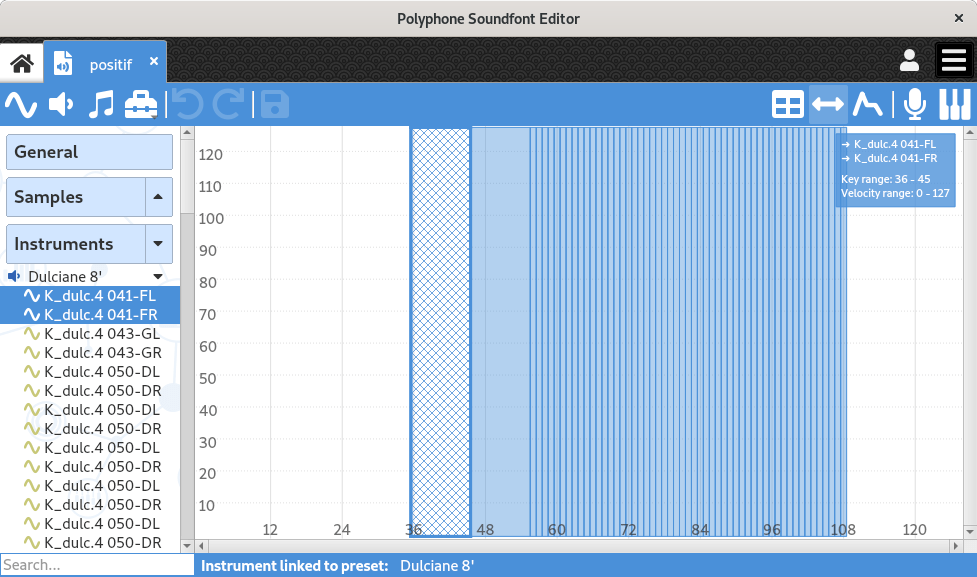
Each sample is represented by a semitransparent rectangle, so that the superposition of several elements is identifiable.
Rectangle selection
A simple left click on a rectangle will select it and removes all other selections. If several rectangles are superimposed, consecutive clicks change the selection under the mouse cursor.
A multiple selection is possible:
- by maintaining button Ctrl and then clicking on the different rectangles to select one by one,
- by using button Shift: all rectangles between the first rectangle being clicked and the next one will be selected.
Updating the rectangles
After having selected one or more rectangle(s), it is possible with the left button to:
- change the size, when you grab one of the edges of a rectangle;
- change the position, by pointing to the center of a rectangle.
If several rectangles are selected, all changes are made synchronously.
Drag & zoom
Maintaining the right click allows you to change the zoom around the selected point.
Maintaining the left click allows you to move the graphic if the initial point is not on a rectangle.
Envelope editor
The envelope editor provides a graphical overview of the 8 parameters defining the volume envelope and the 8 parameters defining the modulation envelope. This is thus a tool for better understanding the impact of each of these parameters.
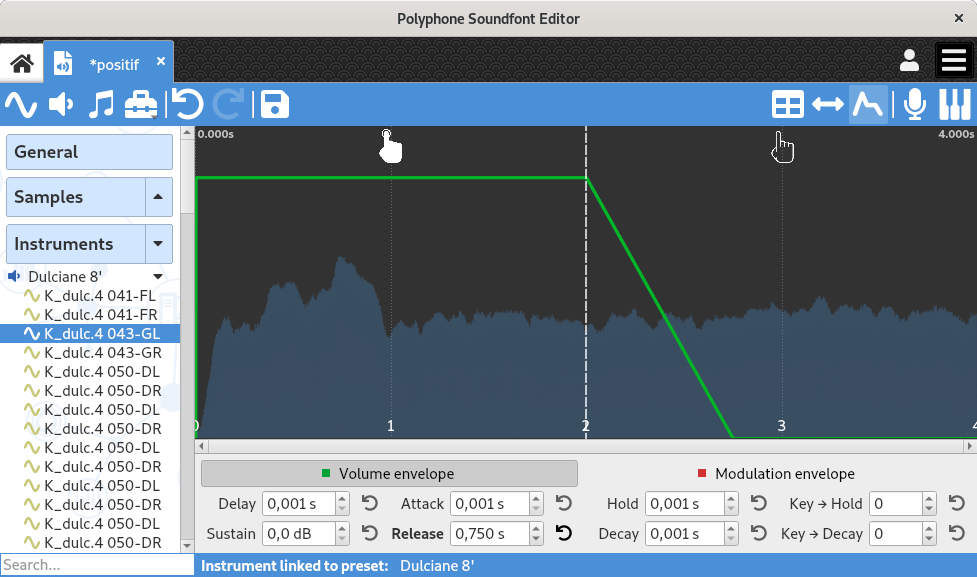
The buttons above the graph select alternatively the volume envelope (displayed in green) or the modulation envelope (displayed in red) for the editing. During the editing of the modulation envelope, the volume envelope is displayed with a thin line.
The left part of the graph represents the evolution of the envelope when a key is triggered. 7 out of the 8 parameters are involved in this representation:
- Delay
- Duration during which the envelope remains at 0 just after a key is triggered. In the majority of cases we want to hear audio immediately after pressing the keys and then this parameter is left at zero. However delay comes in handy for example when we want to create richer pad sounds constructed with several layers. Suppose we want to introduce a second sound layer 0.5 seconds after the key is pressed, then we can set it by entering "0.5" in this -section. A delay does not hold the playback of the sound - it mutes the audio. If we have set the delay to 0.5 seconds, we will start hearing audio after 0.5 seconds of the sample that has already been played.
- Attack
- Duration after delay during which the envelope grows from 0 to the maximum value. For example a bowed string sound like a violin has an attack which is quite long, while a plucked string sound such as a guitar is very short. Even when we want to use an attack as short as possible, an advise is to at least enter a value of 0.001 otherwise a "click" might be heard after pressing a key.
- Hold
- Duration after attack during which the envelope keeps its maximum value.
- Decay
- Duration after hold during which the envelope progressively goes from the maximum value to the value specified by sustain. When the sustain value is set to its maximum or is not set, the volume during the decay will stay at its maximum no matter which value is specified.
- Sustain
- Value after decay sustained as long as the triggered key is not released. Just as attenuation the sustain value refers to the amount of decibel-reduction. In the case where we want to reduce the volume by its half after the decay-time, a parameter of 6 in the sustain-section must be set. Number "144" can be specified if we want to completely mute the sound.
- Key → Hold
- Change of the hold duration depending on the key (see below).
- Key → Decay
- Change of the decay duration depending on the key (see below).
A positive value in Key → XXX gradually decreases the duration of XXX toward the trebles, whereas a negative value does the opposite. For instance:
- value 100 halve the duration of XXX per octave above middle C (60) and double the duration of XXX per octave below middle C,
- value -100 double the duration of XXX per octave above middle C (60) and halve the duration of XXX per octave above middle C.
These parameters can be useful when designing a guitar or a piano with the sustain-pedal on: the lower the tone the longer it lasts until we hear no sound at all.
The right part represents the evolution of the envelope when a key is released. Only the release duration is involved in this representation. The envelope gradually returns to 0 during this duration. Sounds of violins or synth-pads have a relatively long release time, while that of other sounds such as organs are very short. In practice for short release times we still have to set its duration to at least 0.2 seconds, because a release time which is too short doesn't sound pleasant or natural (however it also depends what we have in mind about the construction of the instrument we want to create).
When only one division of an instrument is selected in the tree, the corresponding sound sample is displayed on the background. It is thus possible to better visualize the evolution of the envelope relative to the sample being played.
Modulators
The lower section of the editing page of instruments is intended for the creation of modulators, globally for an instrument or for a particular division. When you play an instrument, a modulator listens to one or two MIDI signal(s) and modify one of the parameters in the table according to the mathematical rule configured. The output of a modulator can also be used as input to another modulator (this function appeared in version 2.04 of the sf2 format and may not be supported by some synthesizers).
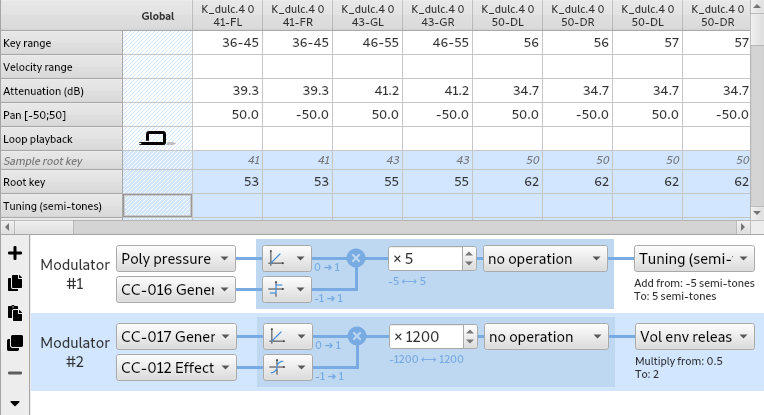
Buttons on the left are made for:
- expanding / collapsing the modulator area,
- adding / removing a modulator,
- copying / pasting / duplicating one or more modulators.
When a modulator is added, the border of the corresponding cell in the table is thicker (see the tuning in the Global column above).
Polyphone is free but there are costs associated with its website and development. A small donation will help a lot.
Donatetop